HubSpot users with admin access can customize permissions for new and existing users in your HubSpot account. Learn how to access your Users & Teams setting to update user permissions.
Contacts, companies and tasks
By default, all users have access to contacts. On the Contacts tab, you can set more granular permissions and restrictions for contacts, companies, and tasks, and other functions relating to the CRM. To manage user permissions for your conversations inbox, review the documentation on how to create a conversations inbox.
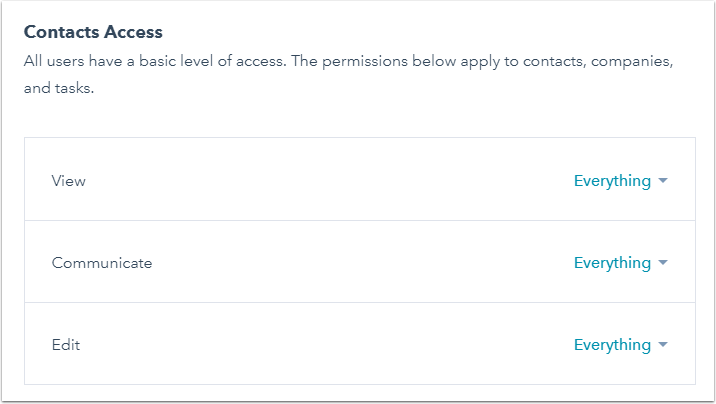
Contacts Access
- View: click the dropdown menu to control the set of contacts, companies, and tasks the user can view.
- The options are Everything, Team only, and Owned only.
- When selecting Team only or Owned only, select the Unassigned checkbox to allow the user to see unassigned contacts and companies.
- Users with View: Owned only permissions will only see their owned contacts on the contacts dashboard and in the lists tool (Marketing Hub only).
- Communicate: click the dropdown menu to control the set of contacts and companies the user can email, call, or schedule a meeting with.
- The options are Everything, Team only, Owned only, and None.
- When selecting Team only or Owned only, select the Unassigned checkbox to allow the user to see unassigned contacts and companies.
- Edit: click the dropdown menu to control the set of contacts, companies, and tasks the user can edit.
- The options are Everything, Team only, Owned only, and None.
- When selecting Team only or Owned only, select the Unassigned checkbox to allow the user to see unassigned contacts and companies.
Please note: ownership permissions are based on the Contact owner property and custom HubSpot user field type properties. Users with Team ownership permissions can access records owned by any members of their assigned team(s) and, if you have parent-child teams (Enterprise accounts only), the members of their team's child teams.
CRM Settings Access
The settings below apply to contacts, companies, deals, tickets, and tasks.
- Bulk delete: toggle the switch on to grant the user the ability to bulk delete contacts, companies, deals, tickets, and tasks.
- Import: toggle the switch on to grant the user the ability to import contacts, companies, and deals into your HubSpot account.
- Export: toggle the switch on to grant the user the ability to export contacts, companies, and deals from your HubSpot account.
- Workflows (Marketing Hub Professional and Enterprise only): toggle the switch on to grant the user access to the workflows tool.
Please note: if you have a HubSpot Sales Hub Professional account and do not have a Marketing Hub Professional or Enterprise subscription, all users in your account will have access to the workflows tool. Learn more about which actions are available based on your account type.
- Edit property settings: toggle the switch on to grant the user the ability to create or edit properties in your HubSpot account, and grants the user access to the lead scoring tool.

Marketing
On the Marketing tab, users with admin access can set permissions for marketing publishing tools.
- Marketing Access: toggle this switch on to grant the user access to marketing tools, such as access to the email tool. With the switch on, users with admin access can further edit the permissions on a more granular level for another user.
- Ads: select the checkboxes to grant Publish or Read access to the ads tool.
- Blog: select the checkboxes to grant the user Publish, Write, or Read access to the blog tool. Users with Write access can create content in the blog tool, but cannot publish new posts or update live posts.
- Email: select the checkboxes to grant the user Publish, Write, or Read access to the email tool. Users with Write access can create emails, but cannot send marketing emails or save emails for automation to use in workflows (Marketing Hub Professional and Enterprise only). In order to publish or delete a marketing email, users must have Publish access.
- Landing pages: select the checkboxes to grant the user Publish, Write, or Read access to the landing pages tool. Users with Write access can create landing pages but cannot publish new pages or update live pages.
- Website pages: select the checkboxes to grant the user Publish, Write, or Read access to the website pages tool. Users with Write access can create website pages but cannot publish new pages or update live pages.
- URL redirects: select the checkbox to grant the user Read or Write permissions in the URL redirects tool. Users with Write access can create and update URL redirects.
Please note: a user must have Write or Publish access to at least one of the marketing tools above in order to access the calls-to-action tool.
-
- HubDB (Website add-on only): select the checkboxes to grant the user Publish, Write, or Read access to HubDB.
- Read: the user can see data within the table rows and export data, but cannot add additional data.
- Write: the user can add rows to a table, clone locked rows, import data, and export data.
- Publish: the user can add new rows, edit existing rows, and delete rows from a table.
- HubDB (Website add-on only): select the checkboxes to grant the user Publish, Write, or Read access to HubDB.
Please note: users must have Edit HubDB tables enabled in admin access to update table settings and create, clone, unpublish, or delete HubDB tables.
-
- Social publishing: click the dropdown menu to control the social accounts the user can publish to. Users with All accounts, Their accounts only, or Draft only social permissions can see all shared social accounts in social monitoring, publishing, and reports, as well as any social accounts they connected.
-
All accounts: the user can publish to social accounts they connected, or to any shared social accounts. The user can also configure social settings.
-
Their accounts only: the user can only publish to social accounts they connected.
-
Draft only (Marketing Hub Enterprise only): the user cannot publish to any social accounts, but can create draft social posts in social accounts they connected or any shared social accounts.
- None: the user has no access to the social tool, which will not appear in the navigation menu when they are logged in.
-
- Lists: toggle the switch on to grant the user access to the lists tool.
- Forms: toggle the switch on to grant the user access to the forms tool.
- Reporting: toggle the switch on to grant access to reporting tools.
- The reporting tools include traffic analytics, page performance, keywords, competitors, tracking URL builder, events (Marketing Hub Enterprise only), and reports settings.
- The setting does not control access to the reporting add-on. Permissions relating to the reporting add-on are in the Admin section under Edit reports ownership.
- Edit code templates & modules: toggle the switch on to grant the user the ability to edit coded templates and modules. Users without the Edit code templates & modules permission cannot access the template marketplace.
- Content staging: toggle the switch on to grant the user access to the content staging tool.
- Edit website settings: toggle the switch on to grant the user the ability to edit website settings. Users with this permission can connect or disconnect website domains.
- Social publishing: click the dropdown menu to control the social accounts the user can publish to. Users with All accounts, Their accounts only, or Draft only social permissions can see all shared social accounts in social monitoring, publishing, and reports, as well as any social accounts they connected.

Sales
On the Sales tab, users with admin access can set more granular permissions and restrictions for deals and the sales tools.
Deals Access
The settings below apply to deals.
- View: click the dropdown menu to control the set of deals the user can view.
- The options are Everything, Team only, and Owned only.
- When selecting Team only or Owned only, select the Unassigned checkbox to allow the user to see unassigned deals.
- Edit: click the dropdown menu to control the set of deals the user can edit.
- The options are Everything, Team only, Owned only, and None.
- When selecting Team only or Owned only, select the Unassigned checkbox to allow the user to see unassigned deals.
- To prevent the user from creating new deals or editing any existing deals, select None.
Please note: ownership permissions are based on the Deal owner property and custom HubSpot user field type properties. Users with Team ownership permissions can access records owned by any members of their assigned team(s) and, if you have parent-child teams (Enterprise accounts only), the members of their team's child teams.

Sales Access
- Sales Access: toggle this switch on to grant the user access to sales templates, documents, and calling. With the switch on, the user with admin access can further edit the sales permission for the user.
- Sales Starter/Professional/Enterprise: toggle the Sales Starter/Professional/Enterprise switch on to grant the user access to sales tools available for the seat: messages (Sales Hub Starter, Professional, and Enterprise only), sequences (Sales Hub Starter, Professional, and Enterprise only) and playbooks (Sales Hub Enterprise only).
Please note: If you've assigned all of your paid seats, you can click Purchase another User to upgrade a user. Learn more about managing paid Sales Hub users.
-
- Quotes: select the checkboxes to grant the user Publish or Write access for quotes.
- Set playbooks permissions: select the checkboxes to grant the user Publish or Write access to playbooks. Only Sales Hub Enterprise users with admin access can edit a user's Publish and Write permissions for playbooks.

Service
On the Services tab, you can set more granular permissions and restrictions for tickets and the service tools.
Tickets Access
The settings below apply to tickets.
- View: click the dropdown menu to control the set of tickets the user can view.
- The options are Everything, Team only, and Owned only.
- When selecting Team only or Owned only, select the Unassigned checkbox to allow the user to see unassigned tickets.
- Edit: click the dropdown menu to control the set of tickets the user can edit.
- The options are Everything, Team only, and Owned only.
- When selecting Team only or Owned only, select the Unassigned checkbox to allow the user to see unassigned tickets.

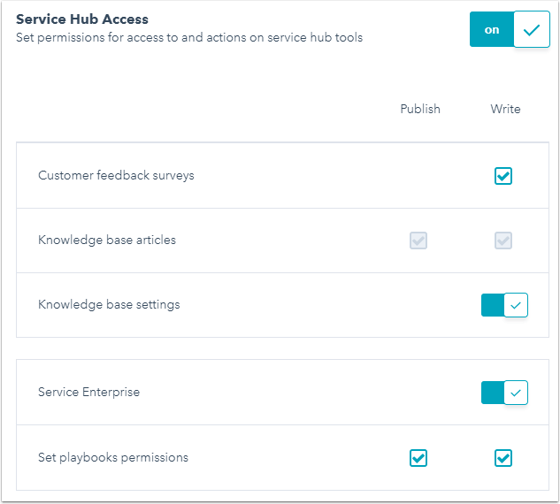
Service Hub Access
- Service Hub Access: toggle the switch on to grant the user access to the service tools. With the switch on, the user with admin access can further edit the services permissions for the user.
- Customer feedback surveys: the Write checkbox grants the user the ability to create surveys in the feedback tool.
- Knowledge base articles: select the checkboxes to grant the user Publish or Write access to the knowledge base tool. Users with the Write access can create knowledge base articles, but cannot publish or update them.
- Knowledge base settings: toggle the switch on to grant the user the ability to edit the knowledge base settings. This permission will also grant the user Publish access to the knowledge base tool by default. Users with this permission can also connect or disconnect website domains.
- Service Starter/Professional/Enterprise: toggle the Service Starter/Professional/Enterprise switch on to assign the user a Service Hub Starter, Professional, or Enterprise seats, if they are available. Learn more about managing paid Service Hub users.
- Set playbooks permissions: select the checkboxes to grant the user Publish or Write access to the playbooks tool. Only Service Hub Enterprise users with admin access can edit a user's Publish and Write permissions for playbooks.
Admin
On the Admin tab, you can set more granular permissions and restrictions for account administration.
- Admin Access: toggle this switch on to grant the user admin access. With the switch on, users with admin access can further edit the administrative rights for the user.
- Add and edit users: toggle this switch on to grant the user the ability to add or edit other users. A user with admin access can only grant permissions to another user that they have e.g. the user with admin access doesn't have Sales access, they cannot assign Sales access to another user.
- Add and edit teams: toggle this switch on to grant the user the ability to organize other users into specific teams.
- Partition by teams: toggle this switch on to grant the user the ability to assign content access to specific users and teams.
- Edit account defaults: toggle this switch on to grant the user the ability to set your account's name, language, time zone, currency and default date and number format.
Please note: if you're a user in a Professional or Enterprise account and are using multiple currencies, you must be a Super Admin in order to edit the account's default currency.
- Modify billing & change name on contract: toggle this switch on to grant the user the ability to make changes to your HubSpot account's billing information.
- Edit reports ownership: toggle this switch on to grant the user the ability to make changes to ownership of reports on the reports dashboards.
- Edit HubDB tables: toggle this switch on to grant the user the ability to configure table settings and create, clone, unpublish, or delete HubDB tables.
- App Marketplace Access: toggle this switch on to grant the user the ability to connect apps from the App Marketplace.
At any time during the user creation process, you can make the user a Super Admin by clicking the Actions dropdown menu and selecting Make Super Admin. This gives the user access to all tools and settings outlined in this article, with the exception of paid Sales Hub or Service Hub features. Learn how to assign these features to your users, including Super Admins. Super Admins also have access to the account’s API key.

Partner account
On the Partner tab, you can grant a user access to partner tools in your HubSpot account and designate them as a Partner employee in client portals. By default, all new users in a partner account will not be granted access to partner tools until Partner tools access is toggled on.
- Partner tools access: toggle this switch on to grant the user access to partner tools.
- Partner dashboard: select the checkboxes to grant the user Write or Read access to the partner dashboard.
- Partner directory: select the Write checkbox to grant the user Write access to the directory.
- Partner employee: toggle this switch on in a HubSpot Partner account to mark a user as a Partner employee when they are added as a user in a client's HubSpot account.
