If you have a HubSpot Enterprise account, you can set up single sign-on using Active Directory Federation Services (AD FS).
To use AD FS to log in to your HubSpot account, you must meet the following requirements:
- All users in your Active Directory instance must have an email address attribute.
- You are using a HubSpot Enterprise account.
- You have a server running Microsoft Server 2012 or 2008.
Please note: this setup process should be done by an IT administrator with experience creating applications in your identity provider account. Learn more about setting up SSO with HubSpot.
Add a Relying Party Trust (RPT)
Open your Active Directory Federation Services (AD FS) manager:
- In your AD FS manager, open the Relying Party Trusts (RPT) folder.
- In the right sidebar menu, select Add Relying Party Trust....
- In the Add Relying Party Trust Wizard dialog box, click Start to add a new RPT.
- On the Select Data Source screen, select Enter data about the relying party manually.
- Click Next >.
- In the Display name field, enter a name for your trust - this is for internal purposes, so make sure you name it something that you can easily recognize.
- Click Next >.
- On the Configure Certificate screen, leave the default settings as they are, then click Next >.
- Select the Enable Support for the SAML 2.0 WebSSO protocol checkbox. In the Relying party SAML 2.0 SSO service URL field, enter https://api.hubspot.com/login-api/v1/saml/acs?portalId=[yourHubID] (add your HubID after "portalId=" in the URL).
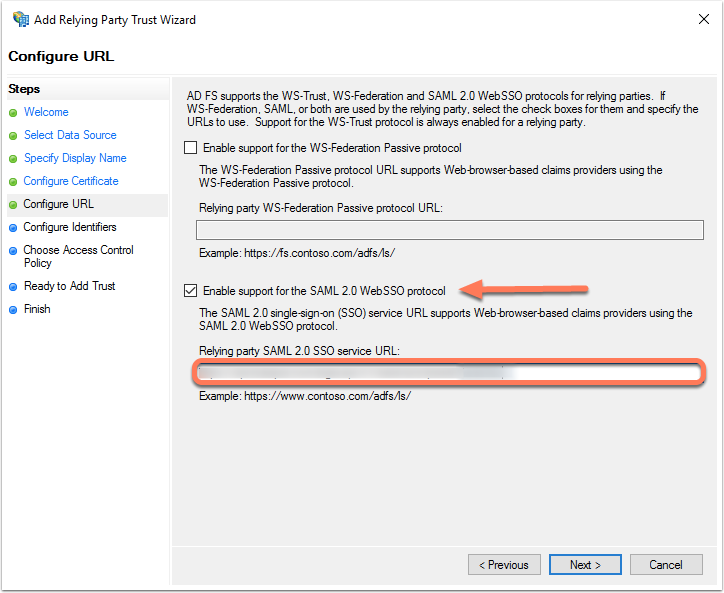
- Click Next >.
- In the Relying party trust identifier field:
- Enter https://api.hubspot.com/login-api/v1/saml/login/[yourHubID] (add your Hub ID after the last "/"). Click Add.
- Enter https://api.hubspot.com, then click Add.
- Click Next >.
- In the Choose an access control policy window, select Permit everyone, then click Next >.
- Review your settings, then click Next >.
- Click Close.
Create claims rules
Before setting up your claims rule, make sure that your users' email addresses match their HubSpot user email addresses. You can use other identifiers, such as the User Principal Name (UPN), if your UPNs are in the form of an email address. In order for single sign-on with AD FS to work, the nameID needs to be in the form of an email address in order to match with a HubSpot user.
- In the Claims Rule window, click Add Rule.
- Click the Claim rule template dropdown menu and select Send LDAP Attributes as Claims.
- Click Next >.
- On the Configure Claim Rule screen:
- In the Claim rule name field, enter a rule name.
- Click the Attribute store dropdown menu and select Active Directory.
- In the Mapping of LDAP attributes table, map the following:
- In the LDAP Attribute column, click the dropdown menu and select Email Addresses.
- In the Outgoing ClaimType column, click the dropdown menu and select Email Address.
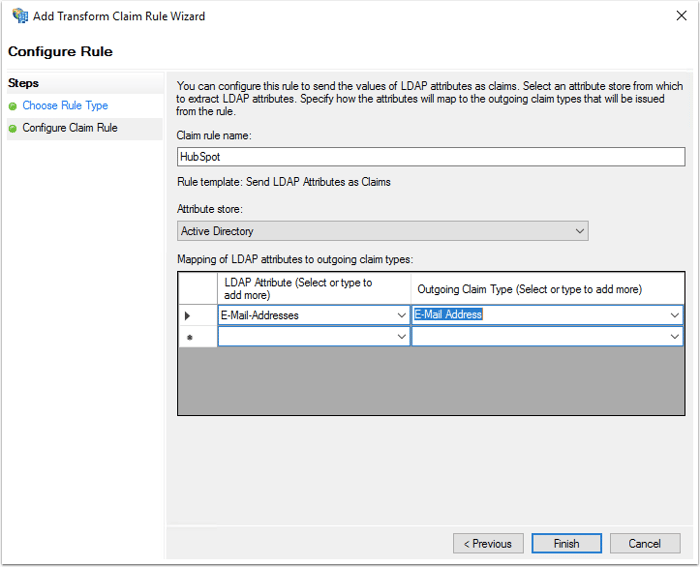
- Click Finish.
Next, set up the Transform an Incoming Claim rule:
- Click Add Rule.
- Click the Claim rule template dropdown menu and select Transform an Incoming Claim.
- Click Next >.
- On the Configure Claim Rule screen:
- Enter a claim rule name.
- Click the Incoming claim type dropdown menu and select E-Mail Address.
- Click the Outgoing claim type dropdown menu and select Name ID.
- Click the Outgoing name ID format dropdown menu and select Email.
- Click Finish to add the new rule.
- Click OK to add both new rules.
Adjust the trust settings
In the Replying Party Trusts folder, select Properties from the Actions sidebar menu. Click the Advanced tab and make sure SHA-256 is specified as the secure hash algorithm. Though both SHA-256 and SHA-1 are supported, SHA-256 is recommended.
Locate your PEM format x509 certificate and complete your set up in HubSpot
To access your PEM format x509 certificate:
- Navigate to the AD FS management window. In the left sidebar menu, navigate to Services > Certificates.
- Locate the Token signing certificate. Right-click the certificate and select View Certificate.

- In the dialog box, click the Details tab.
- Click Copy to File.
- In the Certificate Export Window that opens, click Next.
- Select Base-64 encoded X.509 (.CER), then click Next.
- Give your file export a name, then click Next.
- Click Finish to complete the export.
- Locate the file you just exported and open it using a text editor, such as Notepad.
- Copy the contents of the file.
- Log in to your HubSpot account.
- In your HubSpot account, click the settings icon settings in the main navigation bar.
- In the Single sign-on (SSO) section on the Account Defaults screen, click Set up.
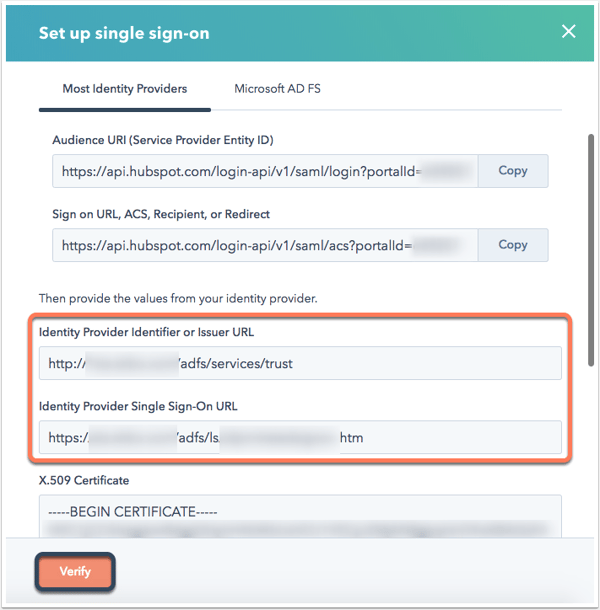
- In the Set up Single sign-on slide-in panel, paste the contents of the file into the X.509 Certificate field.
- Return to your AD FS manager.
- In the left sidebar menu, select the Endpoints folder.
- Search for SSO service endpoint and the entity URL. The SSO service URL usually ends in “adfs/services/ls” and the entity URL ends in “adfs/services/trust”.
- Return to HubSpot. In the Identity provider Identifier or Issuer field, enter the entity URL. In the Identity Provider Single Sign-On URL field, enter the SSO service URL.
- Click Verify.
Please note: if you receive an error when configuring single sign-on in HubSpot, check your event viewer logs on your device for the error message. If you are not able to troubleshoot the error message, contact HubSpot Support.